
First things first! I'm a hardcore Marvel fan. My friend is a huge DC fan! He asked me to make something for him. Ss here we are! Let's get to the pattern without further talking...
Things you will need:
Yarn: Anchor Knitting Cotton [black, grey, yellow & peach]
Hook: 1.5mm
Doll stuffing
Gauge:
8 sc x 8 rows = 1 inch x 1 Inch
Terms/Stitches used:
FC – Foundation Chain
Ch – Chain
Sl st – Slip Stitch
Sc – Single Crochet
Hdc – Half Double Crochet
Dc – Double Crochet
BLO – Back Loop Only
FLO – Front Loop Only
Dec – Decrease (2 stitches together unless mentioned otherwise)
Inc – Increase (2 stitches in the same stitch unless mentioned otherwise)
Picot - ch2 sl st in 2nd ch [boots]
FO – Fasten Off
Pattern Notes:
- The entire doll is worked inside out in rounds, except the cape.
- I use a contrasting piece of scrap yarn as a Stich Marker. You can find a tutorial here.
- I prefer using the Invisible decrease for sc as it does not leave a weird looking bump. Here is a tutorial on how to do the invisible decrease while working inside out.
- Stuff as you go wherever possible.
- While fastening off, remember to leave a tail long enough to sew the parts together.
- For the face, when we start the colour changing with peach, the colours are signified with B for Black & P for Peach. Ex: if a line reads “4Bsc, 5Psc, 3Bsc” it means – make 1sc with Black in the next 4 stitches, make 1sc with Peach in the next 5 stitches, make 1sc with Black in the next 3 stitches.
Arms: (x2)
In BLACK
Ch 2 [or magic ring]
R1 – 6sc
R2 – 6sc
R3 – [dec, sc] x 2 [4]
R4 – inc, 3sc [5]
R5 – inc, 4sc [6]
R6 – inc, 5sc [7]
R7 – inc, 6sc [8]
Switch to GREY
R8 – FLO 8sc
R9 – [dec, 2sc] x 2 [6]
R10 – [inc, 1sc] x 3 [9]
R11 – 9sc
R12 – 9sc
R13 – [dec, 1sc] x 3 [6]
R14 – [inc, 1sc] x 3 [9]
Arm 1 – remove last sc & FO
Arm 2 – make 4 more sc & FO
Mark them with different coloured threads so you can identify them later.
Leg: (x2)
In BLACK
Leaving a long tail, ch 5
R1 – 3sc in 2nd ch, 2sc, 5sc in next ch. Continue working on the other side of the FC, 2sc, 2sc in last ch, sl st [14]
R2 – ch1, FLO 14sc, sl st [14]
R3 – ch1, 5sc, dec x 2, 5sc, sl st [12]
R4 – ch1, 3sc, sk 6, 3sc [6]
R5 – 6sc
R6 – inc, 5sc [7]
R7 – 1sc, inc, 5sc [8]
R8 – 2sc, inc, 5sc [9]
Do not cut black thread. Join GREY & work FLO.
G-R9 – 3sc, inc, 5sc [10]
G-R10 – 3sc, inc, 4sc, inc, 1sc [12]
Do not cut the grey thread. Go back the black thread & work in the BLO.
B-R9 – [2sc, inc] x 2, 1sc, 1hdc, 2dc in next st, picot, 2dc in next st, continue working in both loops, 1hdc, sc around to the back of the leg and sl st. FO [the Boots are over].
Sew up the top of the feet with the long tail.
Continue with GREY,
R11 – 1sc, inc, 5sc, inc, 4sc [14]
R12 – 14sc
R13 – 1sc, dec, 5sc, dec, 4sc [12]
R14 – [dec, 2sc] x 3 [9]
R15 – [inc, 2sc] x 3 [12]
R16 – [inc, 3sc] x 3 [15]
R17 – 15sc
R18 – 6sc, inc, 8sc [16]
R19 – 16sc
R20 – 16sc
R21 – 16sc
R22 – 16sc
R23 – 16sc
Leg 1 – make 4 more sc, ch2 & FO
Leg 2 – continue working the body by joining the legs

R24 – 11sc, join Leg 1, 2sc in chs, 16sc, 2sc in chs, 5sc [36]
Make 2sc and move marker
R25 – [dec, 7sc] x 4 [32]
R26 – [dec, 6sc] x 4 [28]
R27 – [dec, 5sc] x 4 [24]
FO GREY.
The Underpants:
With BLACK ch 13
R1 – 12sc
R2 – ch1 turn, dec, 8sc, dec [10]
R3 – ch1 turn, sc3tog, 4sc, sc3tog [6]
R4 – ch1 turn, dec, 2sc, dec [4]
R5 – ch1 turn, dec x 2 [2]
R6 – ch1 turn, 2sc
R7 – ch1 turn, 2sc
R8 – ch1 turn, inc x 2 [4]
R9 – ch1 turn, inc, 2sc, inc [6]
R10 – ch4 turn, 3sc in chs, 6sc, 3 chainless sc [12]
Fold in half,
R11 – make 24 sc across both edges.
Before fitting the underpants over the legs, make sure that in R11 the right side is facing in…
In the next row, align the underpants [R11] with the legs [R27] and work them together.
R12 – 24sc
R13 – 24sc
SC around to mid back & FO
Belt:
Right side facing out, with YELLOW.
24hdc - FO
Upper Body:
Join GREY in the centre of back
R1 – 24sc
R2 – 24sc
R3 – 4sc, inc x 4, 8sc, inc x 4, 4sc [32]
R4 – 32sc
R5 – 32sc
R6 – 32sc
Make 1sc & move marker.
Joining the Arms.
R7 – 8sc, 9sc in Arm 1, 16sc, 9sc in Arm 2, 8sc [50]
R8 – 2sc, dec, 3sc, dec, 7sc, dec, 3sc, dec, 4sc, dec, 3sc, dec, 7sc, dec, 3sc, dec, 2sc [42]
R9 – [dec, 5sc] x 6 [36]
R10 – [dec, 4sc] x 6 [30]
R11 – [dec, 3sc] x 6 [24]
FO with a long tail. Sew across the shoulders.

At this point he looks quite weird…!!! Don’t worry, once we add the head and the cape he’ll be fine!!
Mask – Ears: x 2
With BLACK, In magic ring,
2dc & FO
[Optional - You can block the ears so that they stay pointy. The 2dc's will be the base of the ears & the magic ring is the pointy end]
Mask – Head:
With BLACK [B]
R1 – 6sc in magic ring [7]
R2 – inc x 6 [12]
In the next row, we will be attaching the ears. When it says "sc with ears" - Insert hook in next sc of head & dc of ear, pull up a loop and finish the sc.
R3 – 2sc, 2sc with ears, 4sc, 2sc with ears, 2sc [12]
R4 – 12sc
R5 – 12sc
From this row we will start colour changing for the face with PEACH [P].
R6 – 4Bsc, 5Psc [FLO], 3Bsc [12]
R7 – 4Bsc, 5Psc, 3Bsc [12]
R8 – 4Bsc, Psc5tog, 3Bsc [8] [FO PEACH]
R9 – [inc, 1sc] x 4 [12]
Sl st & FO.
Using some black and white scrap yarn, sew the eyes & mouth. Secure in place with some fabric glue.

Cape:
[the turning ch is not counted as a stitch here]
In BLACK - FC ch 10
R1 – sc in 2nd ch from hook, 8sc, make 6dc in the last ch, working on opposite side of the FC, 7dc, 6dc in the last ch. [28]
R2 – ch2 turn, 19 dc [19]
R3 – ch2 turn, [2dc, inc] x 6, dc in last dc [25]
Keep working 25dcs each row till you are happy with the length. I've done around 14 rows.
Sew the head to the cape first and then attach it to the body
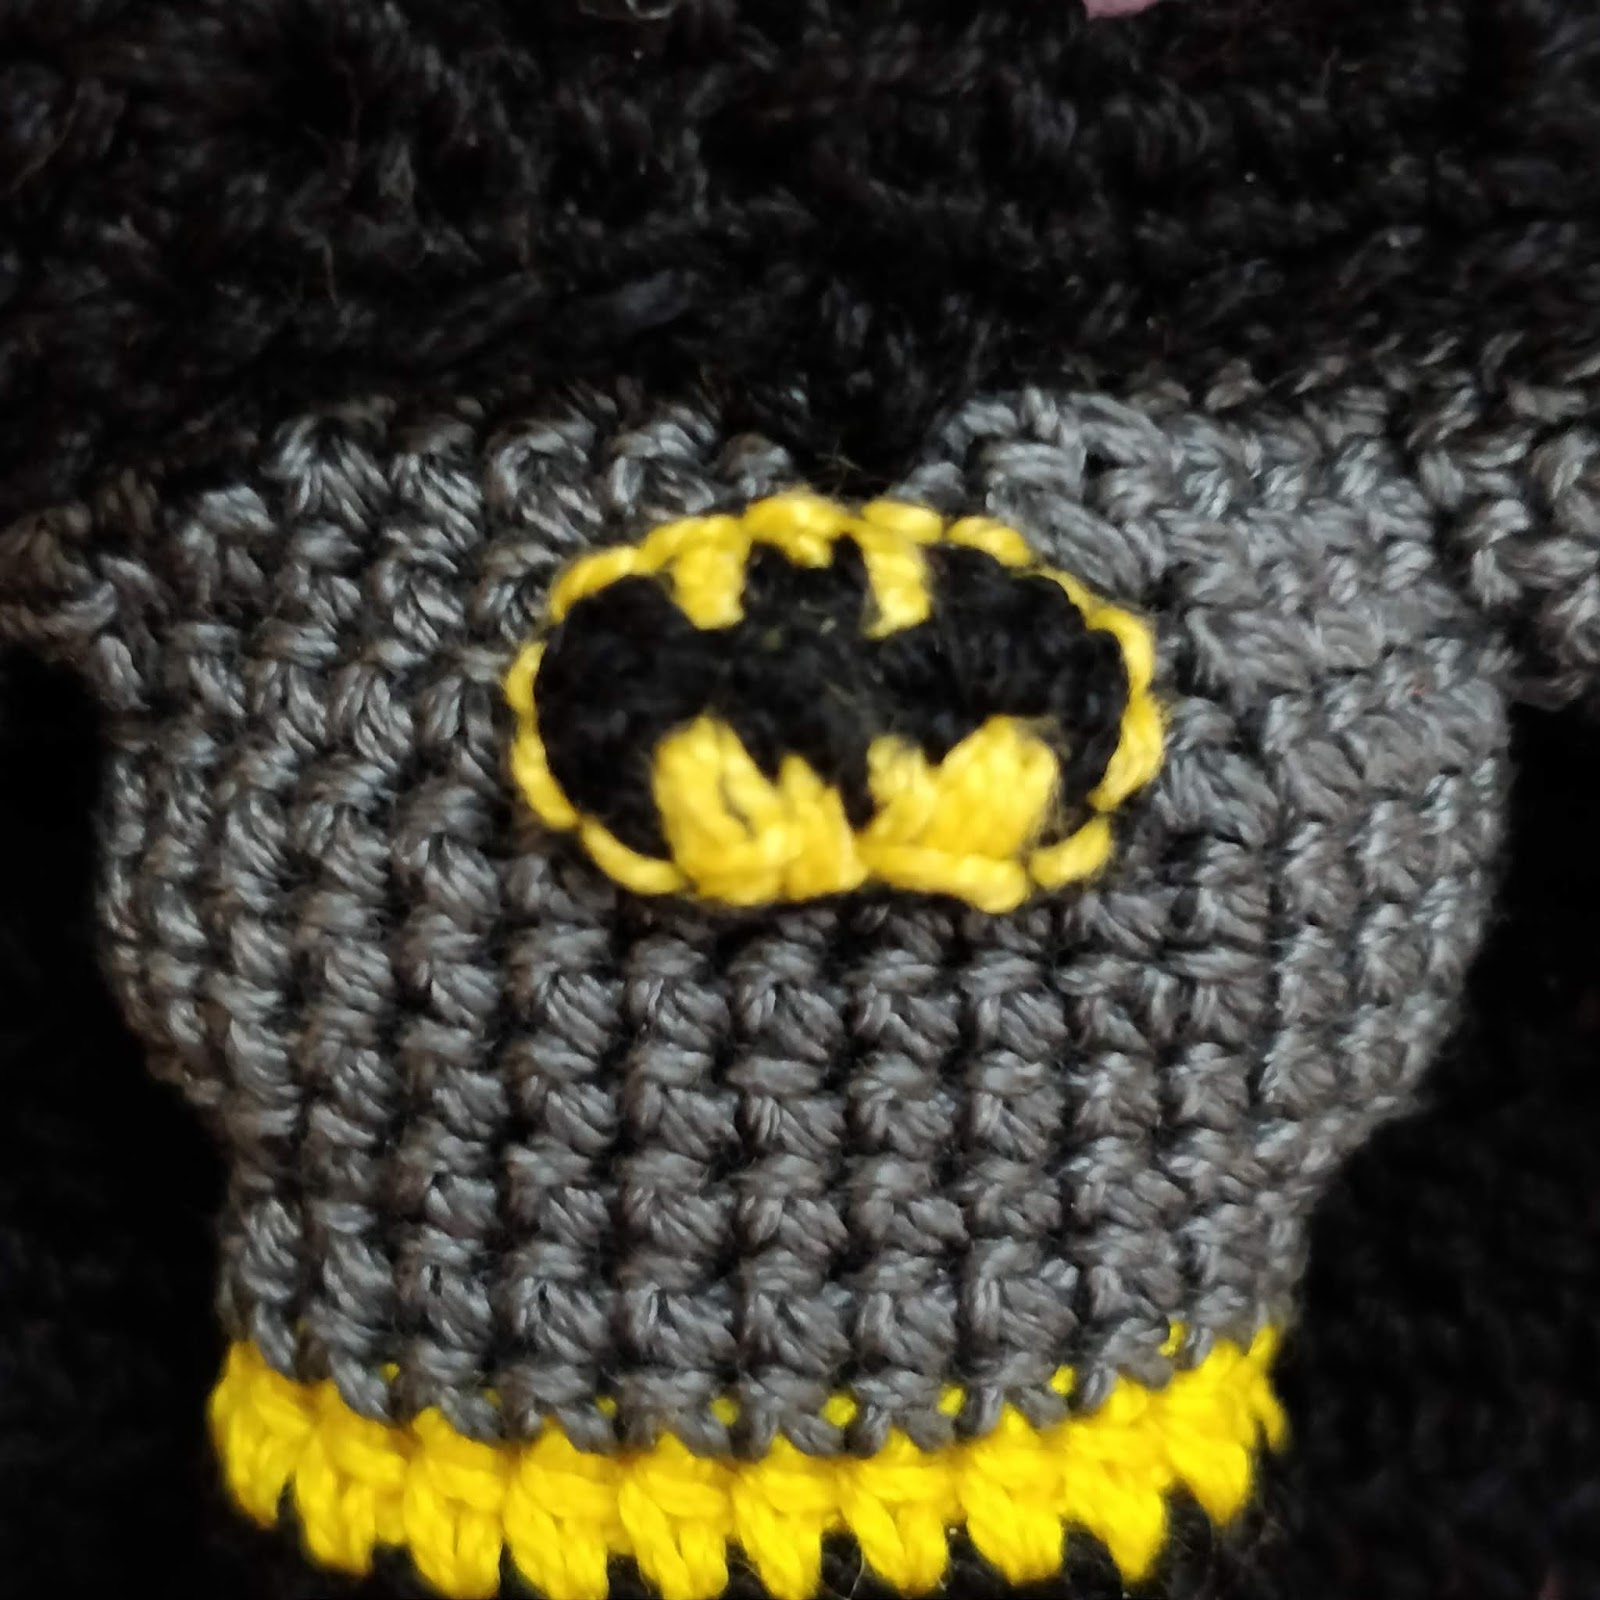
Logo:
Pearl cotton, 0.85mm
BLACK
Ch 6
3dc in 3rd ch, 2dc, 6dc in last ch, 2dc, 2dc in last ch.
FO
With YELLOW, sew the bat symbol.

If you have any questions regarding this pattern post them in the comments section. You may sell the items made out of this pattern, but do credit me as the designer.
Subscribe to my channel & hit the bell button to get notifications on new videos.
Follow @madewithlovebydaisy on Instagram to receive updates on new patterns & giveaways.
Daisy
Thank you
ReplyDeleteYou're welcome! Hope you enjoyed making it
DeleteLoved making this batman.. Got loads of compliments for it.. Thanks a lot for sharing this pattern
ReplyDeleteYou're welcome! I'm happy you liked it!
DeleteThank you for your free pattern. Very much appreciated.
ReplyDeleteYou are welcome!
DeleteBuenas tardes en que tamaño queda de antemano gracias
ReplyDeleteThe completed doll measures around 6 inches.
DeleteHola ví tu patrón y lo voy a realizar espero me quedé tan bonito como el que realizaste saludos desde México 🌻
ReplyDeleteThank you! I'm glad you like it! :)
Delete